FAQ’s
Frequently Asked Questions
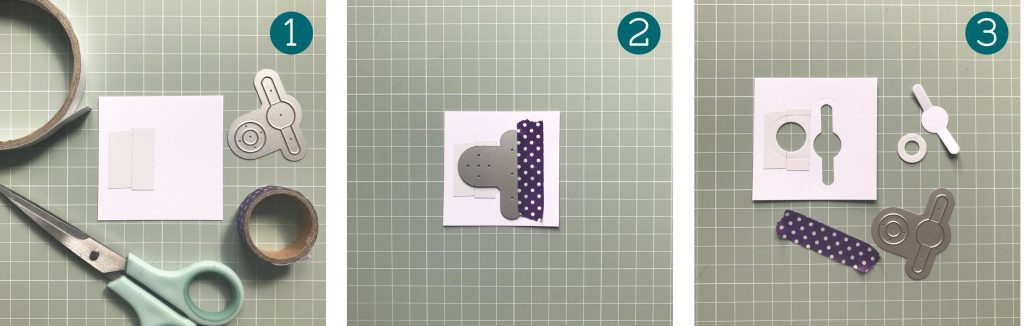
Is there a quick way to attach the donut to the back of a Magic Window without risking using PVA glue?
Yes there is! If you apply two small pieces of double-sided tape to a scrap piece of card and then position only the donut part of the die over the tape, you can die-cut both pieces. That way, the donut will be self-adhesive. See photo steps below…
What is the Trimmer/cropping circle die for?
The cropping circle or ‘Trimmer’ die allows you to crop larger designs and printed photographs to the right size for the Magic Windows dies. This works best when the cropping circle is used to cut paper (up to 130gsm) rather than card. The paper circle is then layered over card (200-220gsm) before cutting the Magic Window pieces through both layers.
It’s important to apply a thin and even layer of adhesive when attaching the cropped paper circle to card. We’ve found a glue stick works best – avoid using PVA glue or adhesive sheets.
How do I know which way up to position the Magic Windows dies?
There’s a handy triangle on each of the Magic Windows dies that marks the top and a rectangle that marks the bottom. This way you can be sure your design/image will be the right way up when the card is constructed.
I’d like to use some of my own stamps to make Magic Windows, what size of stamps can I use?
The cropping circle has a diameter of 10.4cm and it’s a handy tool to gauge whether the stamps you have will fit. Designs within around 10.5cm will work well as it gives you a bit of wiggle room when positioning the Magic Windows dies over the top.
I’d like to make a Magic Windows photo card and scrapbook layout, are there any tips for using photos?
Magic Windows are perfect for using photos! We’ve experimented quite a bit with this technique and we’ve found it’s best to layer up a printed photo over a piece of card, rather than cutting through an actual photograph print. This is mainly because the combined thickness of a real photograph and card is a bit too thick and it’s likely to jam the Magic Window. By printing a photo onto paper such as 120gsm and mounting it onto card stock such as 200-220gsm, you’ll find the Magic Window runs smoothly.
The Magic Windows dies will cut diagonal lines across the two sections and for this reason, it’s important to apply a thin and even adhesive layer. Surprisingly, we’ve found a simple glue stick works best!
I’ve made my Magic Window card using a card stock that wasn’t sturdy enough, is there anything I can do to strengthen the tab?
Yes, you can layer another cut tab piece over the top to strengthen it. To do this, simply die-cut another tab slider piece and then trim away the excess, leaving a little card either side of the rounded tab. This is also a handy technique if you’d like the tab to be in a contrasting colour! It’s easier to layer the trimmed tab over the whole tab piece before the card is constructed. However, if your card is already made, try using a glue pen to apply a small amount of glue to the trimmed tab. Carefully lift up the small flaps that are at either side of the rounded tab and attach the trimmed tab over the top. Once dry, poke the side flaps back in.
My Magic Windows card isn’t sliding that well, what could have caused this?
It’s best to avoid using PVA glue when making Magic Windows, as it tends to be the main culprit. It can either jam the central mechanism, or glue from the edges (when mounting your Magic Window) can spread inwards which doesn’t leave enough space for the pieces to move.
When mounting a Magic Window onto a card base, it’s best to leave a border of at least 2cm around the edges. Using a 3-5mm wide double-sided tape around the edges when mounting works well, too. Trimming too close to a Magic Window will squash the edges when mounting, and the pieces won’t be able to slide easily.
What gsm should I use when making a Magic Windows card?
If you would like to cut a Magic Window directly from the front of a card (using a large platform die-cutting machine), then 250gsm is ideal. The mechanism works well with card up to 280gsm, but we found that at this thickness, you start to get creasing along the flaps as the card is less flexible.
If you are mounting a Magic Window onto a larger card base (remember to leave a wide border), then you could use card that is 200-250gsm.
I don’t have an A4 die-cutting machine. Can I use a Big Shot to make Magic Windows cards?
Absolutely! We mainly use a Big Shot die-cutting machine at home for making Magic Windows. When designing the die, we wanted to make sure that it would work with a Big Shot, as so many crafters use them. We recommend trimming a card to 15.5×15.5cm (or sometimes 15x15cm) which is the maximum width of the Big Shot cutting platform. Use a skinny 3mm double-sided tape around the edges of the card when mounting it onto a larger card base.
We have a ‘Photo Card’ how-to video, which has some useful tips for getting your card dimensions just right: https://angelapoole.co.uk/how-to-guides/
Towards the end of the video, you can see how a Magic Window is mounted to allow space for the mechanism to move freely.
How to download a digital file
Step 1: Log into your account, or create an account if you don’t already have one. Purchase the digital download product as with any other product.
Step 2: Once you have paid for your download, it will appear in the ‘My Account’ section under ‘Downloads’.
Step 3: Simply click the link to begin the download to your computer.
PLEASE NOTE: Paid-for downloads may be downloaded TWICE ONLY. Free downloads do not have a download a limit.
Trouble shooting:
ZIP – Pay In 4
Zip create simple, secure, fair and transparent credit and payment solutions that improve lives every day. Zip allows you to own the things you love now, and pay for them later, all interest-free on purchases up to £1000.
To shop using Zip, you need:
- To be over the age of 18
- To have a UK issued debit card
- To be living in the UK
- To have a good credit history
No. Zip only carries out a soft credit check, so your score is not affected.
When you get to the payment page, select Zip as a payment method.
If it’s your first-time shopping with Zip, you’ll need to enter some personal details such as name, date of birth, mobile phone number and home address. Take care when entering your personal details, errors may prevent Zip from being able to verify your account or send you payment notifications.
Once approved, and you are happy with the instalment schedule, Zip will take the first instalment from the UK debit or credit card you supplied when signing up.
Once accepted, your goods will be sent to you as they would with any other payment method.
Payment information is processed securely by Zip. All transactions take place via secured connections that adhere to the latest industry standards and security protocols.
As soon as your cancellation/return has been accepted by us, Zip will cancel any future scheduled payments as well as refund any amounts due.
As soon as we have registered your cancellation or return, Zip will process your refund within 10-15 business days.
Any partial refunds will be applied to outstanding instalments first.
Zip will automatically attempt to collect payment for your Pay In 4 purchase from the debit or credit card you entered when you signed up to Zip.
If you miss a scheduled payment, and don’t process a payment yourself before midnight on the day that it is due, Zip will charge a £6 late fee for every instalment missed. A payment can be made by you at any time by logging into your Zip customer portal.
Please make sure you have money in your account in advance of your payments coming out.
Zip will contact you by email directly in advance every time as a reminder.
Refunds from Zip shall be issued back to the debit or credit card supplied to Zip.
Nope, Zip are not like traditional finance companies. As long as you pay your scheduled payments on time you will only pay the price advertised.
Payments are automatically scheduled to be taken every 2 weeks.
You’ll pay 25% of your full purchase upfront, then 25% every 2 weeks for the next 6 weeks.
Zip will try to take payment during the day but if this fails, or if you’d like to make a payment earlier, you can log into your Zip customer portal and manually make a payment.
For more information, visit our Help pages at https://zip.co/uk
Zip is the finance provider and will not have information regarding your order status. Please always contact the retailer directly.
*non-payment may affect your credit score if passed to a third-party collections’ agency