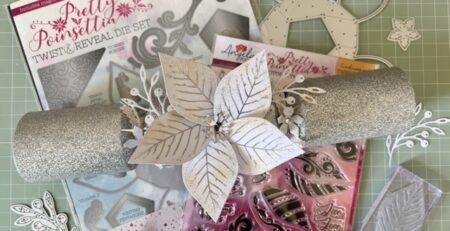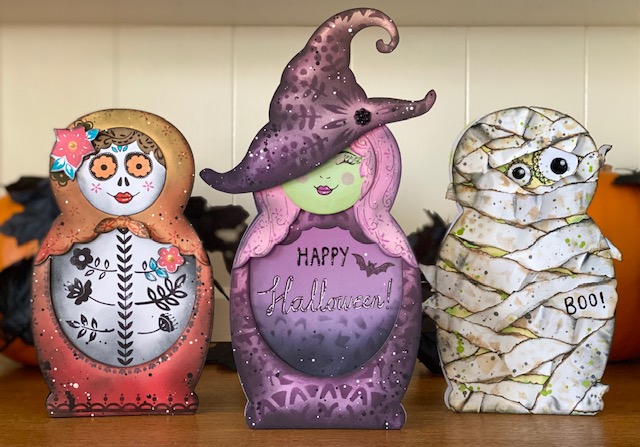
Happy Halloween! ONE die set, THREE different looks!
Halloween is such fun and my children are already super-excited about it! We do a bit of Halloween crafting every year and this year, I suggested making spooky Mummy cards using our Folksy Charm Dolls die set. I’ve already made Mrs Claus cards and Easter bunny cards using the die set. It seems to have become my go-to die set for most occasions! The kids’ cards were a triumph and after tackling their glue mess (seriously, it was epic and I had to peel their cards from the table)…I felt so inspired (and on a roll) that I went on to see how a witch and a Day of the Dead theme would work out?!
I couldn’t have imagined that one die set would work SO well with a Halloween theme and produce three completely different looks!!
For those of you who already have this die set, I’m hoping that this inspires you to have a go at making Halloween cards, and if you don’t…well, we’re adding temptation by making the entire Folksy Charm collection HALF PRICE! But be warned, when it’s gone, it’s GONE!
Enchanting Witch card
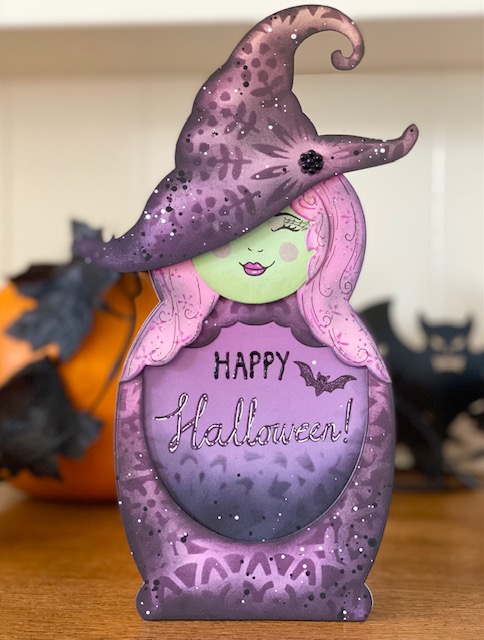
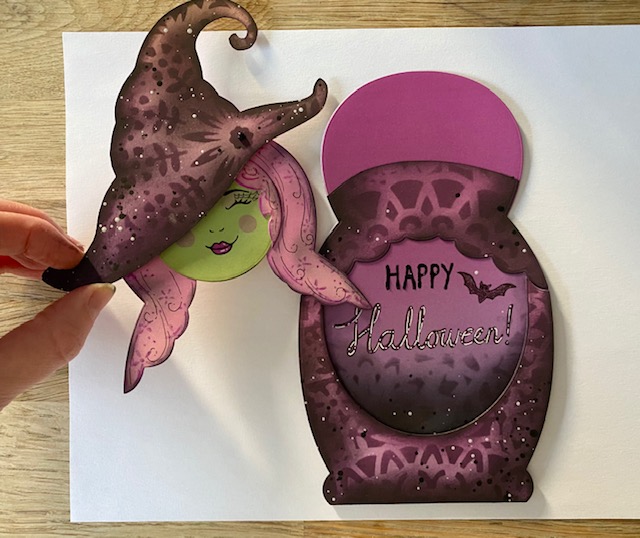
I didn’t have a plan when I started making this card, but it was a fun journey! When I finished, I thought “this has to be my Halloween costume this year!” Haha!
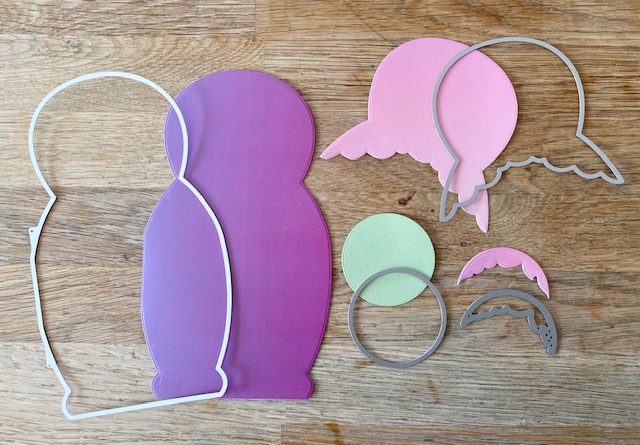
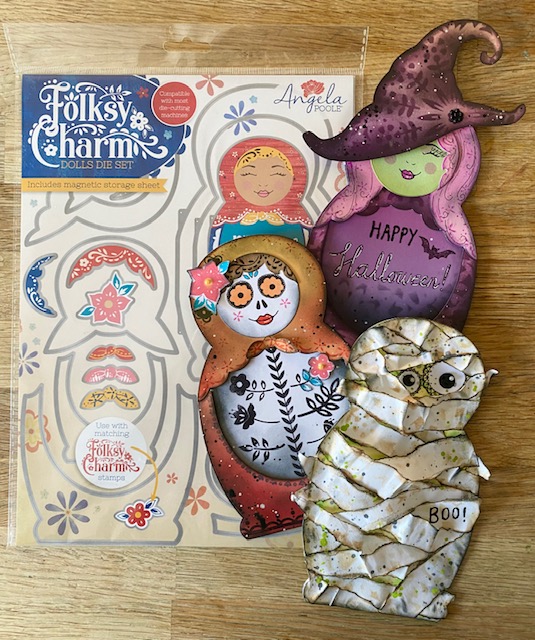
The Folksy Charm shaped card die works by cutting through a folded card base (up to 250gsm) and it creates the doll-shaped base. There are lots of other dies in the set which were originally for doll faces, hair, scarves, etc. but you can get creative and use them in different ways too.
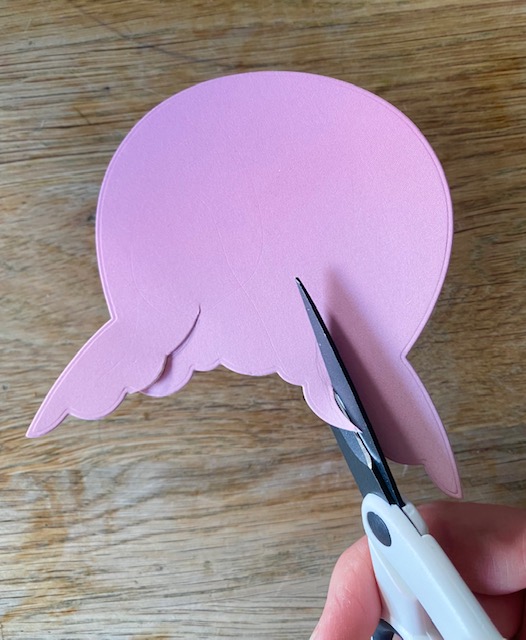
I had a thought that the large scarf could be trimmed to look like long hair, so I cut into the middle section.
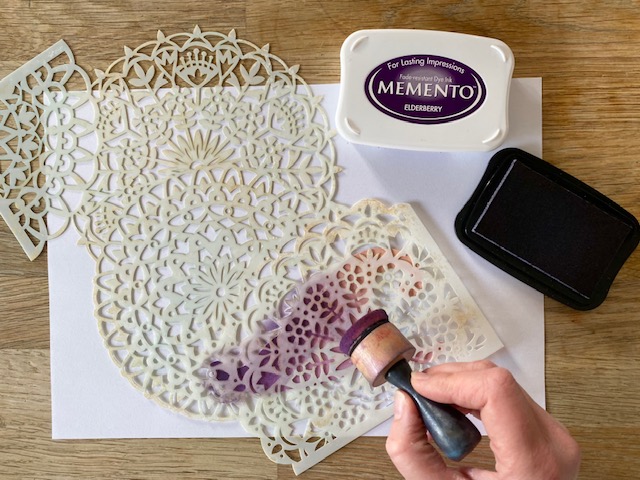
This stencil is one I use again and again because it’s so versatile. It’s called Floral Charm and is part of our amazing 50% off sale! I’ve positioned the stencil so that the pattern works with the shape of the hat I drew and cut out. And as an extra treat for you, we’ve included the Witch Hat as a FREE template here.
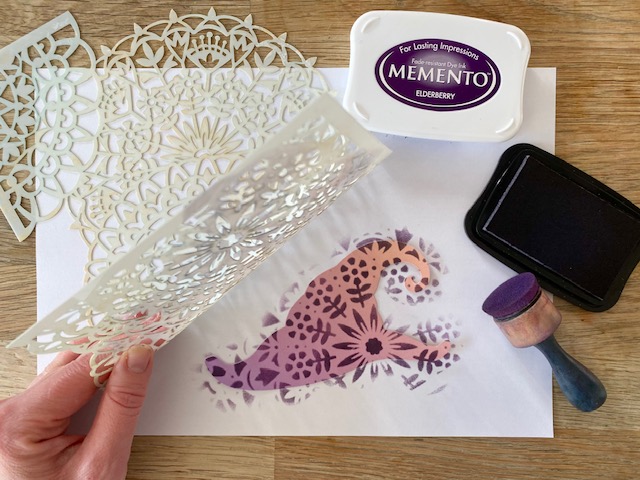
Even without adding shading to the edges, it looks SO GOOD! I also used the stencil to add a pattern to the base layers and neck scarf pieces.
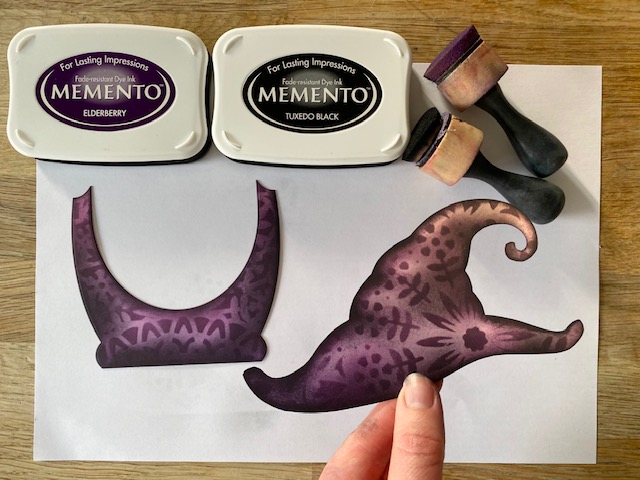
Here’s how a couple of the pieces look with inked edges. I added shading by taking the ink up further along the ‘creases’ in the hat.
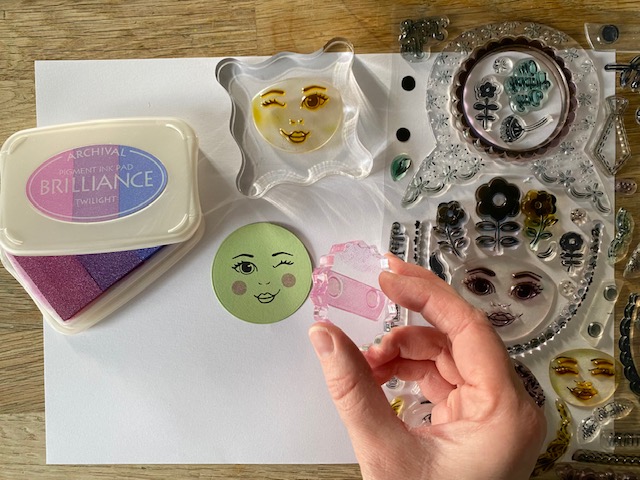
If you take a peek at the Folksy Charm stamp set, you’ll see it’s absolutely packed with stamps! The dies and stamps work together to make three different sizes of dolls. But I’m mixing it up with a large doll face and a medium-sized winking stamp.
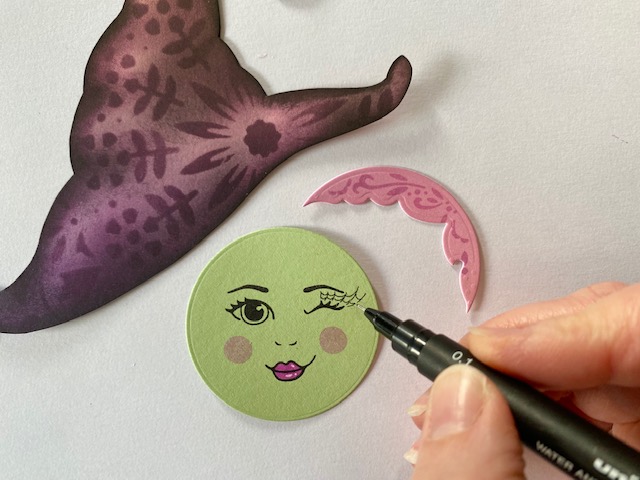
I added touch of glam Halloween make-up with cobweb eyes. Don’t worry about the other side as it will be covered by the hat.
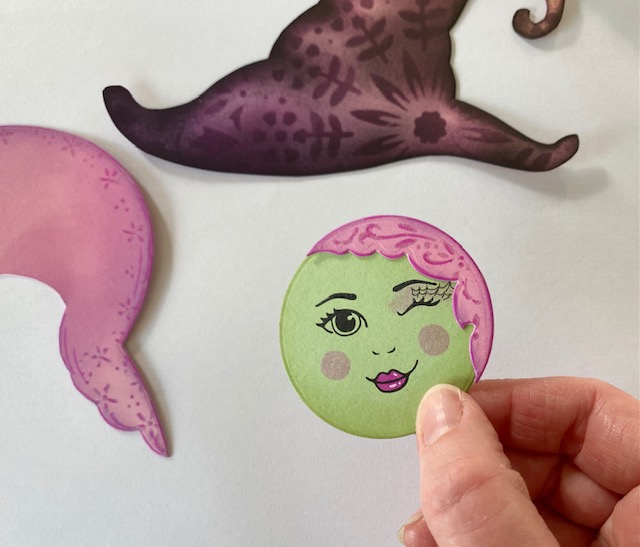
Instead of attaching the hair centrally on the top, I’ve positioned it on the side so that it will look like a layered hair cut when finished.
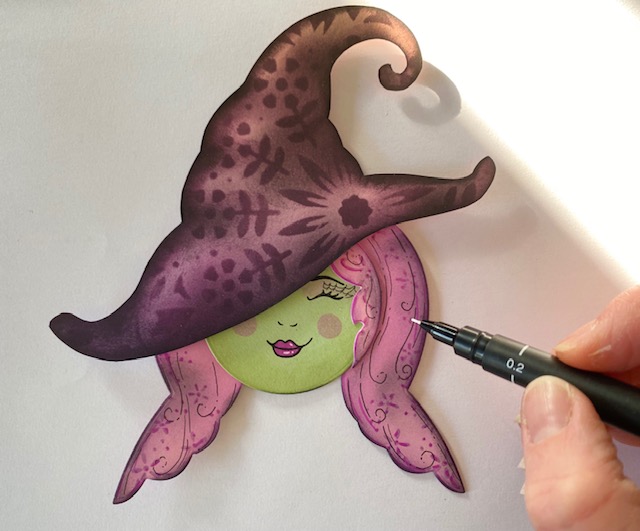
I used sticky pads to attach the hat for a 3D look. There’s a decorative stamp in the Folksy Charm stamp set which I used to stamp the hair. I drew several swirls and dots to add to the look of gorgeous locks.
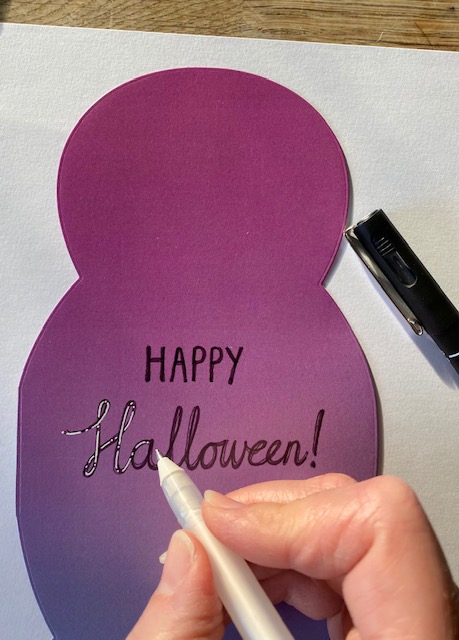
If you have a Halloween stamp then you could use it here – or just free style like I did! The hand-written greeting looked a little flat just in black ink, so I used a white gel pen to lift it. I also went over the ‘happy’ with black gloss accents.
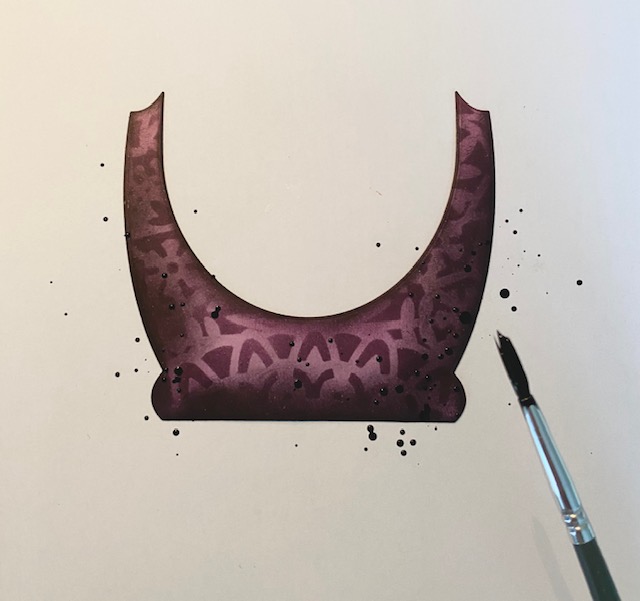
Flicking paint or ink always feels high risk but it’s a lot of fun and I love the effect. I added little flecks of black and iridescent white paint over the pieces. (I masked the face and hair of the witch when doing it).
I added the face to the top of the card. I love this photo as you can see how the stencil patterns come together and form the witch’s outfit!
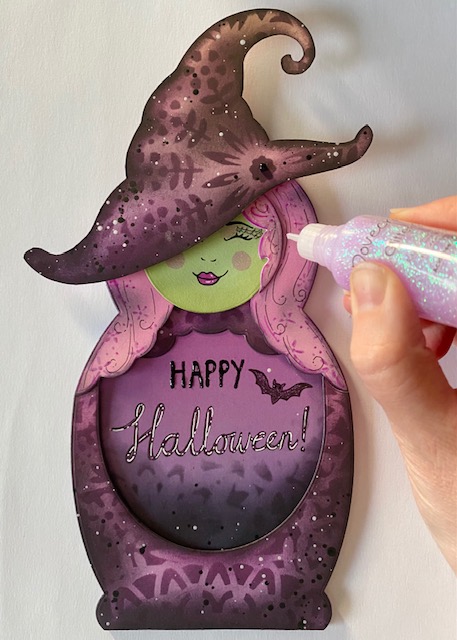
And to finish, I added some glitter glue highlights to the hair. (Strictly only for crafting and not for real hair lol!)
Spooky Mummy Card
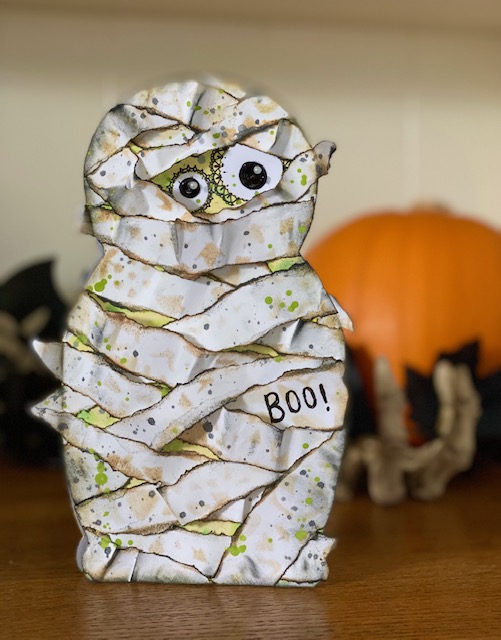
This card was so quick and easy to make! You could get a completely different look by changing the colour of the base card and bandages.
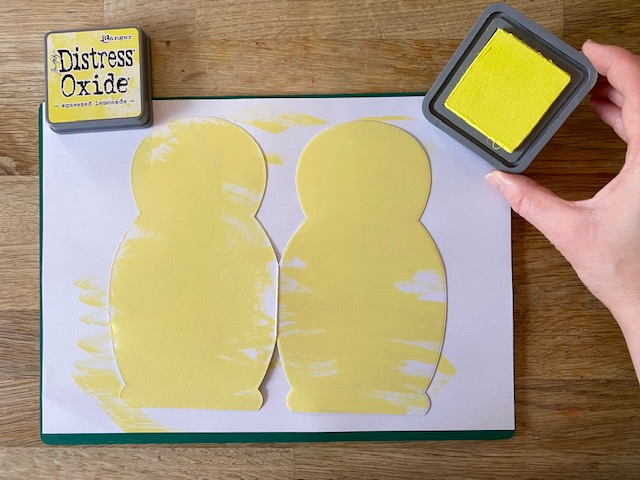
I cut the doll-shaped base from white card using the Folksy Charm Dolls die set, and coloured the front and back with Distress Oxide. I applied the ink pad directly over the surface of the card, to achieve this patchy application of colour.

I used the Floral Charm stencil in two ways. First, I applied an old turquoise Versa Color ink pad over the stencil to add a pattern to the base card.
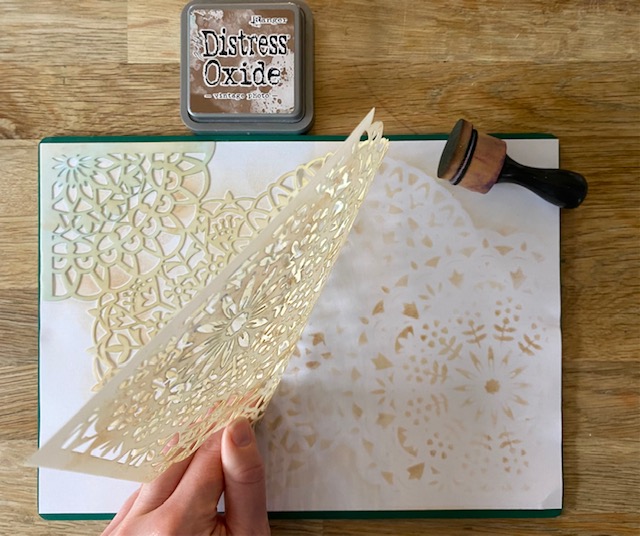
Then I used the stencil again, this time with white copy paper and Vintage Photo Distress Oxide. This sheet is to make the bandages. I tore them into strips and then inked the edges with brown and then black ink. This creates an old, singed look to the bandages. It helps to scrunch them up a bit too.
I did try the bandages without the stencil pattern but they didn’t look as good without it. If anyone has glow-in-the-dark paint and tries this technique then we would love to see the results!
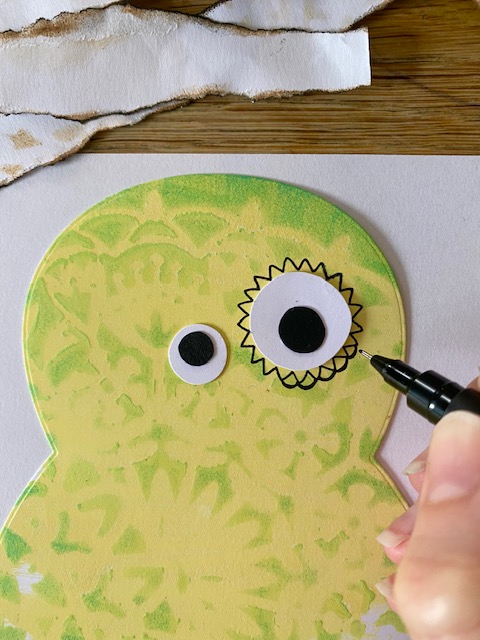
I cut two irregular eyes from white and black card and doodled a pattern around each eye. I used the stencil for pattern inspiration.
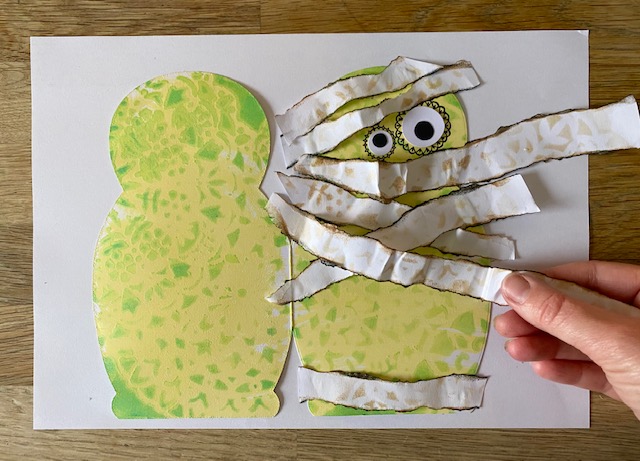
Now for the fun bit! The aim is to roughly cover the base card, whilst leaving some gaps and the eyes peeping through the bandages! I found it helped to attach the ends loosely, as this allows gaps to weave other strips of paper. My children absolutely loved adding bandages to their Mummies!
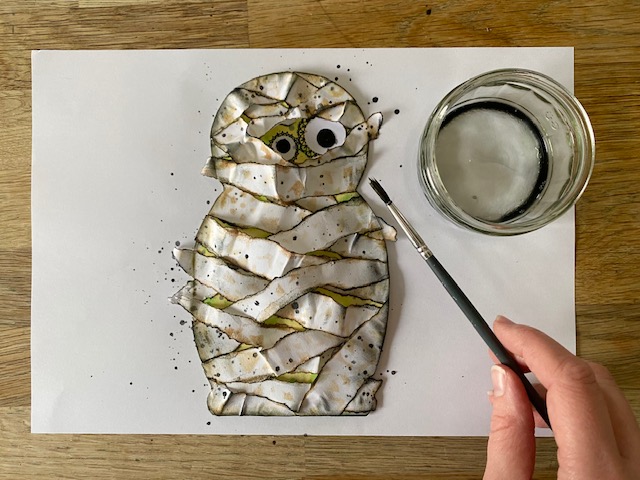
I added a bit more shading with black ink and a blending tool and black glossy accents to the eyes. Then I flicked black paint randomly all over the Mummy card.
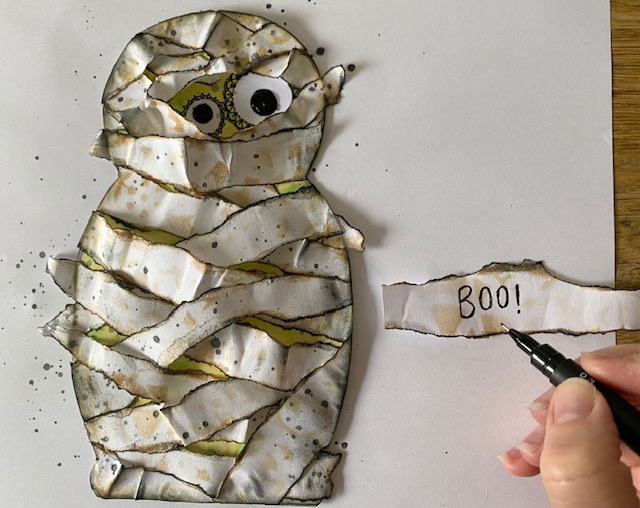
I wrote ‘boo!’ on a spare strip and attached it to the card, tucking it in amongst the other bandages.
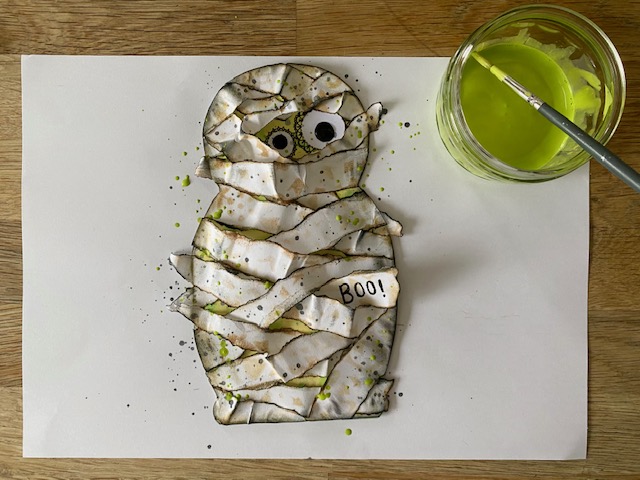
And a splattering of green paint completed the spooky look!
Day of the Dead card

The Folksy Charm stamp set didn’t disappoint when it came to this card! There are so many decorative stamps to choose from including borders, flowers, leaves as well as the facial details and scarf stamps.
Here’s how I gave the die set and stamps a Day of the Dead look…
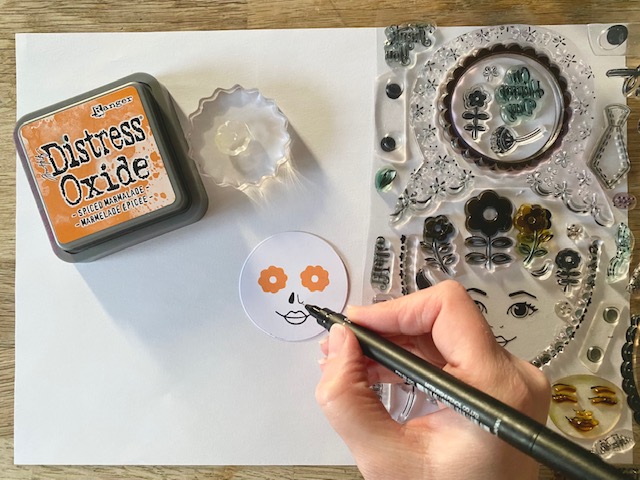
I masked off the facial stamp so that it only stamped the nose and mouth. I stamped flowers for the eyes (I’d love to try this again with different flowers for the eyes!) and using the stamped nostrils as a guide, I drew more of a scull look for the nose.
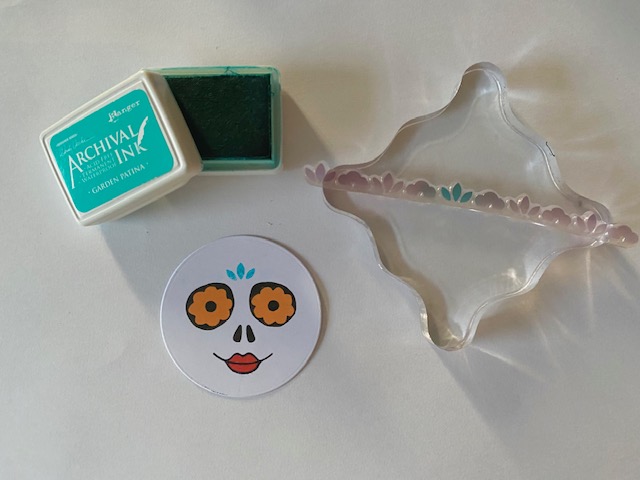
I drew irregular circles around the flowers and filled in the gaps with a black pen. I coloured the lips with a red pen and used a decorative stamp to add a motif to the forehead. I later added floral cheeks and shading around the face with black ink – and I’d recommend doing that now instead of when I did it and the face was already stuck down!
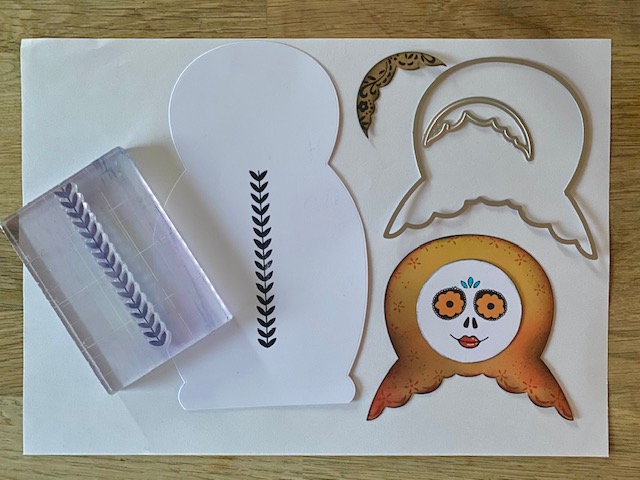
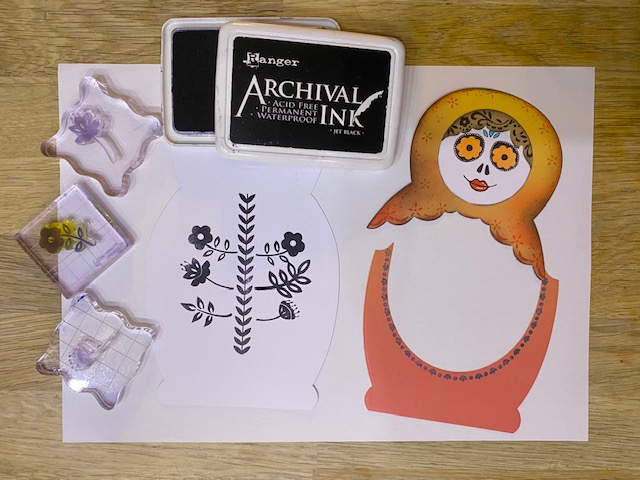
I used the Folksy Charm Dolls die set to cut the doll-shaped base from white card. I used this border stamp vertically to give the impression of a spine. I promise this purpose was never imagined when we originally designed the stamps! The scarf and hair pieces are also de cut using the same die set and there are coordinating stamps for them.
I’ve used various stamps from the Folksy Charm stamp set to give the impression of ribs. Beautiful ribs…is that a thing?! It is now!
The base of the doll has been cut from orange card and stamped with a decorative stamp from the set.
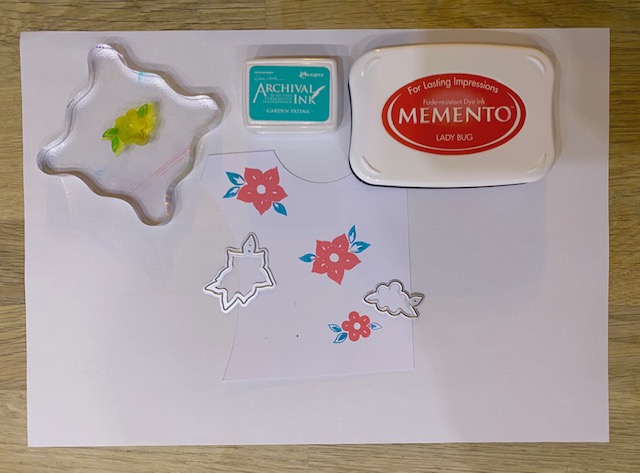
I took full advantage of the coordinating floral stamps and dies here. I inked them up in red and used a scrap of paper to remove the ink from the leaves, before inking them individually with green. I then die-cut the flowers to make a couple of floral embellishments for the card.
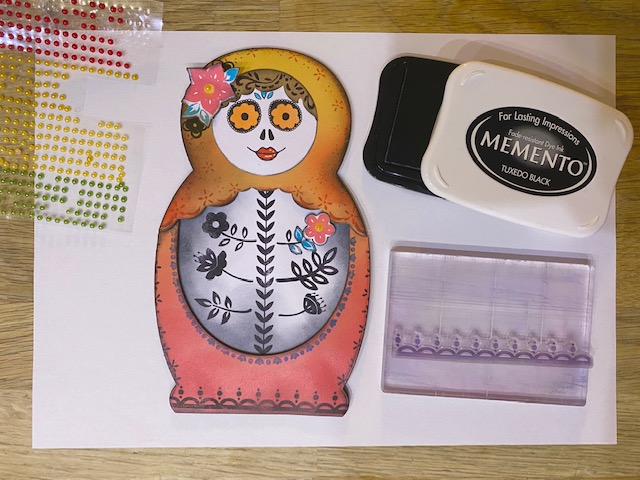
Embellishments added to the card and then a bit more stamping. When is enough, enough? I kept on going! I added a stamped and die-cut scarf knot, and flicked black and iridescent white paint all over the card, with just the face masked off for that step.
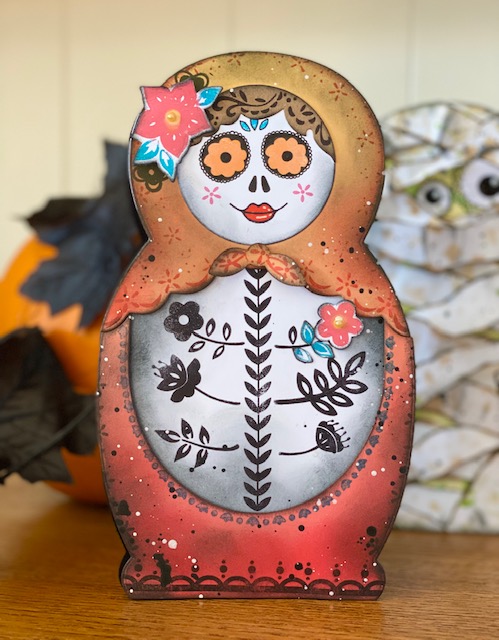
This card looks so striking and I can’t wait to make some more cards along this theme!
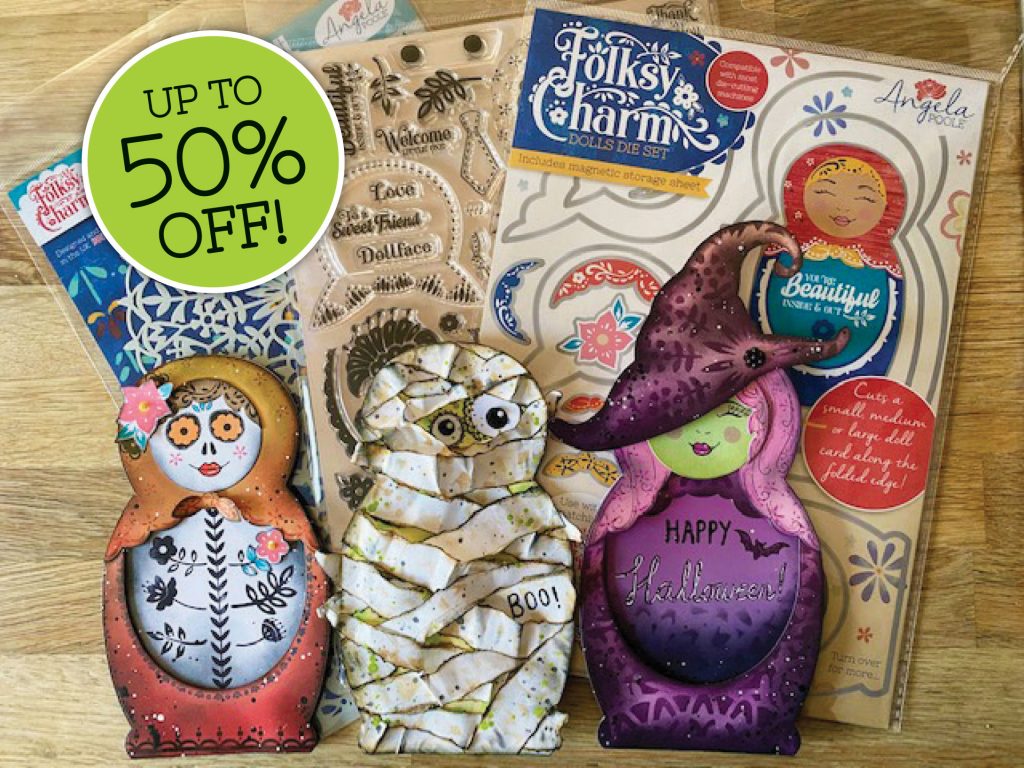
So that’s three Halloween cards with three very different looks using one die set! The stencil and the stamp set are shown here as well. The entire collection is on sale at 50% off while stocks last!
I hope you like my spooky makes and please stop by again soon for more tips and inspiration!
Happy Crafting!
Angela
X